
Architects, interior designers, custom home builders, and real estate developers all work with floor plans — but floor plans are fundamentally hard for clients to read. A 2D drawing communicates dimensions, room relationships, and flow to trained eyes. To everyone else, it's a set of lines and numbers. The gap between what a professional sees in a floor plan and what a client sees is the gap between a confident decision and a hesitant one — and it costs projects time, money, and momentum.
Photorealistic 3D renders close that gap. When a client can see what their future living room looks like from the sofa — the way light falls through the west-facing windows at 4 PM, the proportion of the ceiling, how the kitchen island relates to the dining table — they can make decisions with confidence. Changes are caught early, approvals come faster, and client relationships are stronger. The problem has always been that producing those renders required either a 3D modeling specialist (expensive, slow) or dedicated software with a steep learning curve.
AI rendering has changed the economics of floor-plan visualization. You no longer need to build a 3D model first. You start with the floor plan, add reference photos and style direction, and the AI generates photorealistic room views in minutes. This guide walks through the full process — from what you need to start, to how to get renders that clients will want to show their friends.
What "Floor Plan to Render" Actually Means
It's worth being precise, because the phrase covers several distinct workflows that produce different types of visualizations:
Interior Room Renders from Floor Plan Dimensions
The most common use case: you have a floor plan, and you want to visualize what one or more rooms will look like furnished and finished. The floor plan gives you the room dimensions, window and door positions, and the relationship of each room to the others. Using this as a reference, you provide the AI with photos of the empty space (if construction is complete) or use the floor plan dimensions alone to generate a realistic interior view with specified finishes, furniture, and lighting.
Exterior Renders from Site Plan or Elevation
A floor plan combined with an elevation drawing gives you everything needed to generate a photorealistic exterior render of a building. AI rendering can take a site plan or building elevation and produce exterior visualizations showing the building in context — landscaping, driveway, street view — in daylight, twilight, or any seasonal setting.
Pre-Construction Visualization for Not-Yet-Built Spaces
Perhaps the highest-value use case: the space doesn't exist yet, but the floor plan does. AI rendering generates photorealistic visualizations of how rooms will look when complete — used for pre-construction marketing, client approvals, investor presentations, and permit applications. The floor plan serves as the spatial foundation; the AI fills in the visual reality.
What You Need Before You Start
The inputs that produce the best floor-plan renders are a combination of spatial reference and visual reference. Here's what to gather before starting:
1. The Floor Plan Itself
Your floor plan doesn't need to be a fully annotated architectural drawing. It can be a CAD export, a PDF, a screenshot from a design tool, or a hand-drawn sketch. What matters is that it clearly shows room dimensions, window and door positions, and the overall spatial layout. Higher quality inputs produce more spatially accurate results, but even a clear smartphone photo of a hand-drawn floor plan is usable.
Key information to note before rendering:
- Room dimensions (length × width × ceiling height)
- Window size and placement — natural light is a major factor in render quality
- Door positions and swing direction
- Any structural features: columns, built-ins, fireplaces, stairs
- Orientation (which direction is north/south) — affects light direction
2. Reference Photos of Similar Spaces
If the space doesn't exist yet, reference photos of comparable finished rooms are essential. These serve as visual vocabulary for the AI — they communicate ceiling height, natural light quality, material texture, and the overall feel you're targeting far more effectively than a written description alone. Collect three to five reference images that capture the aesthetic you want: a living room with a similar layout, a kitchen with the countertop material you're specifying, a bedroom that shows the palette you have in mind.
If the space is already built (even in rough/unfinished form), photos of the actual space in its current state are even more valuable — they give the AI accurate geometry to work with.
3. Your Finish and Furniture Specifications
Before prompting, write out the finish schedule and furniture direction for each room you're rendering. This doesn't need to be a complete specification list — just enough to give the AI clear direction:
- Flooring: white oak hardwood, large-format porcelain tile, polished concrete, etc.
- Wall treatment: color and finish (e.g., "warm white with a matte sheen", "sage green limewash")
- Kitchen/bath materials: countertop, cabinet, and backsplash specifications
- Furniture style: mid-century modern, Japandi, transitional, contemporary, etc.
- Lighting mood: morning light, afternoon golden hour, dusk/twilight, bright and neutral
Floor Plan to Render: Methods Compared
| Factor | Traditional 3D Modeling | Rendering Software (SketchUp + V-Ray) | AI Rendering (Rendershop) |
|---|---|---|---|
| Skill required | High — years of training | Medium — steep learning curve | None — describe what you want |
| Time to first render | 2–5 days per room | 4–8 hours per room | 30–60 minutes per room |
| Cost (per room) | $500–$3,000 (freelancer) | $200–$800 (software + time) | $5–$30 per render |
| Works without 3D model | No | No | Yes — from floor plan + reference |
| Design iterations | Expensive, slow | Hours per change | Minutes per variation |
| Output quality | Highest (full control) | High (with expertise) | High (photorealistic, client-ready) |
| Spatial accuracy | Exact — modeled to spec | Exact — modeled to spec | Very good — floor plan informed |
| Best for | High-stakes hero images | Technical presentations | Client approvals, design exploration |
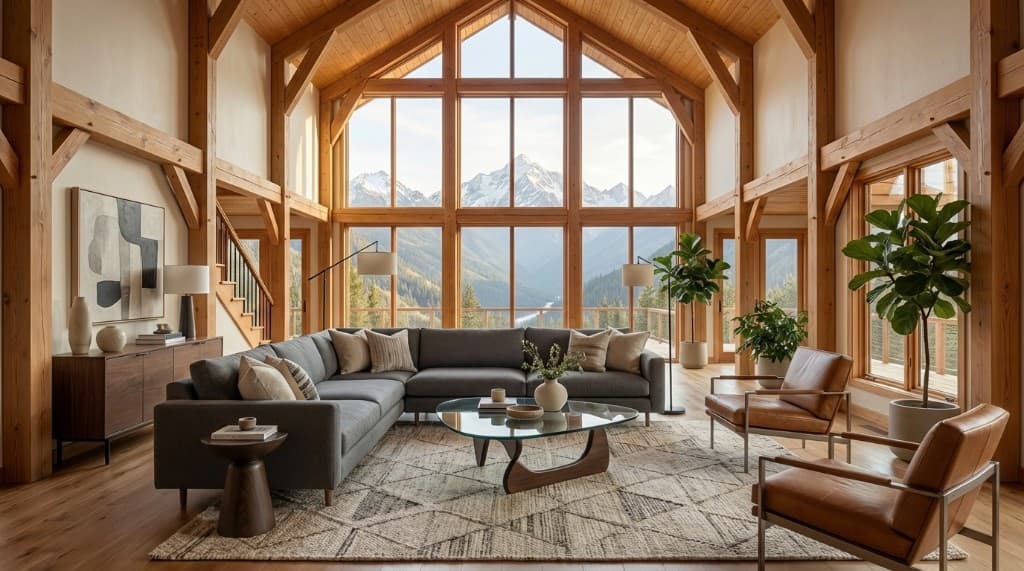
A photorealistic AI render of a living space — visualized from floor plan dimensions and style specifications, no 3D model required
Step-by-Step: Converting Your Floor Plan to a 3D Render
Step 1: Identify Which Rooms to Render First
Don't try to render every room simultaneously. Prioritize by impact: which rooms matter most to your client's decision? For residential projects, this is almost always the main living area and primary bedroom. For commercial projects, it's typically the reception/lobby and the primary work area. For pre-construction marketing, it's the spaces that will appear in the listing or sales materials — usually living room, kitchen, master suite, and outdoor area.
Start with one room, dial in the style and quality, and then use that as the visual template for the remaining rooms. Consistency across renders — same light temperature, same material family, same furniture style — makes a set of room renders feel like a cohesive presentation rather than disconnected images.
Step 2: Gather Your Room's Key Dimensions
From your floor plan, extract the critical dimensions for the room you're starting with. You don't need to provide these as a formal specification — you'll use them to calibrate your prompt and choose reference images that are proportionally similar. A 12 × 16 ft living room with 9 ft ceilings has a very different feel from a 20 × 28 ft great room with 14 ft ceilings; the reference images you select should reflect the actual proportions of your space.
Also note window orientation. A room with south-facing windows in the northern hemisphere will have abundant warm light for most of the day — a key selling point worth emphasizing in your render. A north-facing room requires a different approach: more emphasis on artificial lighting layers, softer ambient light, perhaps a twilight render that showcases how well-lit the space feels at night.
Step 3: Write a Specific, Detailed Prompt
The render quality you get from AI is almost entirely a function of your prompt quality. Vague prompts ("modern living room") produce generic results. Specific prompts produce renders that look like your project. Build your prompt in four layers:
- Space type and dimensions: "A 14 × 20 ft open-plan living and dining room with 10 ft ceilings and three large south-facing windows"
- Finish and material palette: "White oak engineered hardwood floors, off-white plaster walls, exposed concrete ceiling, matte black hardware throughout"
- Furniture style and key pieces: "Furnished in a Japandi style — low-profile walnut sofa, wool bouclé armchairs, a live-edge coffee table, a paper pendant lamp, small olive tree in the corner"
- Lighting and mood: "Afternoon natural light casting warm shadows across the floor, supplemented by warm-white recessed lighting and a single statement pendant, photorealistic photography quality"
See our guide on how to write effective AI rendering prompts for a full framework with copy-paste examples for every room type.
Step 4: Upload to Rendershop and Generate
On Rendershop, upload your source image (the floor plan, a photo of the empty space, or a reference room image), enter your prompt, and run the render. For floor-plan-to-render workflows, we recommend:
- If the space is built: upload a photo of the empty room as your base image — actual geometry produces the most spatially accurate results
- If the space is not yet built: upload a reference photo of a similar space and describe how your project differs in dimensions and materials
- Generate two or three variations with different camera angles — one wide showing the full room, one mid-shot showing the seating area, one detail shot showing material and texture quality
Step 5: Iterate to Match Your Specifications
The first generation usually gets you 70–80% of the way there. Subsequent generations, with refined prompts, close the gap. Common refinements at this stage:
- Add specifics about elements that didn't appear or appeared wrong: "add a kitchen island to the left side, no sofa — a sectional instead, move the dining table to the right"
- Adjust lighting: "more contrast, warmer light temperature, golden hour light entering from the left window"
- Refine materials: "the floor should be lighter oak tone, the countertop should be white quartz not marble"
- Adjust camera perspective: "shoot from a lower angle, more of the ceiling visible, wider composition"
At a few dollars per render, two to four generations per room is typical and still far cheaper than a single revision cycle with a 3D artist.
Who Uses Floor-Plan-to-Render Workflows — and How
Architects and Architecture Firms
Design development is when clients most need to see the spaces they're approving — but it's also when the project is furthest from buildable. AI rendering from floor plans lets architects present realistic room visualizations during schematic design and design development, before construction documents exist, without the cost of a full 3D rendering package. Client approvals happen faster, design changes are caught before they become expensive, and the relationship between client vision and architect intent stays aligned throughout the process.
Many firms now use AI renders as a first pass in design reviews — inexpensive enough to generate for every option being considered — reserving traditional 3D rendering investment for final presentations and marketing materials.
Custom Home Builders
Custom builders work with clients who are spending the most money they've ever spent on a single purchase — and those clients want to see exactly what they're getting. A floor plan is not enough. AI rendering from floor plans gives custom home builders a tool to walk clients through each room of their future home before a foundation is poured. Builders who offer this experience win more projects, experience fewer mid-construction change orders, and generate stronger referrals from clients who felt genuinely understood throughout the process.
Our post on why Rendershop is the best tool for custom home builders covers this workflow in more depth, including how builders use renders to win competitive bids.
Real Estate Developers and Pre-Sales Teams
Developers selling units before construction is complete live or die by their pre-sales marketing imagery. Floor plans alone don't close sales — photorealistic interior renders do. AI rendering from floor plans provides a fast, cost-effective path to a complete pre-sales image library: living rooms, bedrooms, kitchens, bathrooms, views, and outdoor spaces, all visualized from construction drawings at a fraction of the cost of a traditional rendering firm.
Interior Designers
Interior designers often receive a floor plan from an architect or builder and need to communicate their design intent to the client before any work begins. AI rendering from floor plans lets designers quickly generate photorealistic room visualizations from the architectural drawings, overlaid with their material selections and furniture plans. Clients see the finished design in the actual space — not a mood board, not a sample-board presentation, but the room as it will look. Design approvals happen in days, not weeks.
Homeowners Planning Renovations
Many homeowners undertaking a significant renovation — a kitchen remodel, a primary suite addition, an open-plan conversion — have a floor plan from their contractor or designer but no sense of what the finished space will look like. AI rendering gives homeowners the ability to see their future kitchen or bedroom before any walls come down, making design decisions (finishes, materials, layout) far easier and reducing expensive mid-project changes. Most homeowners are not reading floor plans — they're imagining spaces, and AI renders give them accurate imagination fuel.
Frequently Asked Questions
How accurate is AI rendering compared to the actual finished space?
AI rendering is a visualization tool — it generates a highly realistic impression of a space based on your inputs, not a dimensionally precise model. Spatial proportions, window placement, and ceiling height are captured well when you provide accurate floor plan information and good reference photos. Material textures, lighting character, and overall aesthetic are typically very close to spec with a detailed prompt. AI renders are accurate enough for client approvals, marketing, and design decisions — they are not substitutes for technical construction documentation.
Can I render a floor plan for a space that hasn't been built yet?
Yes — this is one of the most valuable use cases for AI rendering. You don't need the space to exist physically. Provide the floor plan, your finish schedule, reference images of similar spaces, and a detailed prompt describing the room. The AI generates photorealistic visualizations of the future space based on these inputs. This is widely used for pre-construction marketing, pre-sale units, design approvals, and permit applications where visual communication of a not-yet-built space is essential.
What's the difference between floor-plan-to-render and sketch-to-render?
Sketch-to-render typically refers to converting a hand-drawn design concept — a perspective sketch, a napkin drawing, an elevation sketch — into a photorealistic image. Floor-plan-to-render starts from a 2D orthographic drawing (a floor plan), which contains spatial and dimensional data that a sketch may not. Floor plans give you more structural information to work with; sketches give you more perspective and aesthetic intent. Both are valid inputs for AI rendering, and many workflows use both: the floor plan for accurate spatial reference, and a sketch or reference image for aesthetic direction.
How many renders should I produce from a floor plan?
For a typical residential project, plan for two to four renders per primary room (living area, kitchen, primary bedroom, key bathroom) plus exterior renders if applicable. That's typically eight to sixteen images for a complete project visualization. Each render at a different camera angle or lighting variation adds communication value — a wide shot of the room, a detail shot of the kitchen finishes, a golden-hour exterior — at minimal additional cost. At a few dollars per render, the constraint is your creative judgment, not your budget.
Can I use floor plan renders for planning permission or zoning applications?
Many planning and zoning authorities accept photorealistic renders as supporting visualization materials, alongside formal construction drawings. AI renders are typically not accepted as a substitute for approved architectural drawings, but they are increasingly welcomed as supplementary visual communication — particularly for design review boards, HOA approvals, and public consultation processes. Always check your local authority's submission requirements. See our full post on rendering for HOA and zoning board presentations for a deeper dive.
The Floor Plan Is the Foundation — the Render Is What Closes the Deal
Every architectural project, renovation, or development starts from a floor plan. The floor plan is the document that defines what will be built. But it is rarely the document that inspires a client to say yes, convinces an investor to commit, or helps a buyer picture their life in the space. That work is done by visualization — and photorealistic 3D renders are the most powerful visualization tool available.
AI rendering has made that tool accessible to everyone who works with floor plans. You don't need a 3D modeling background, specialized rendering software, or a large visualization budget. You need a floor plan, clear material and style direction, and a platform that can translate that information into a photorealistic image. With that combination, you can produce client-ready room renders in under an hour, explore design variations in minutes, and present every project at a level of visual quality that was previously reserved for large firms with substantial production budgets.
Whether you're an architect presenting a design development concept, a builder selling a not-yet-built custom home, a developer marketing pre-sale units, or a homeowner planning a renovation, Rendershop's AI rendering tools give you the ability to turn your floor plan into a photorealistic 3D render — quickly, affordably, and without technical barriers.
Turn Your Floor Plan into a Photorealistic Render
Upload your floor plan or reference image and get a client-ready 3D visualization in under 60 minutes — no 3D modeling skills required.
— The Rendershop Team

